A patio bar is the perfect way to elevate your outdoor space, providing a stylish area to entertain guests or simply enjoy a refreshing drink on a sunny afternoon. Whether you have a spacious deck or a small balcony, creating a patio bar that suits your style and needs is easier than you might think. Here’s how to set up a functional and stylish patio bar, with a focus on essential accessories like a patio bar cart, patio bar table, and patio lamps.
1. Choose the Right Location
The first step in setting up a patio bar is selecting the right location. Choose an area with enough space to accommodate a bar cart, seating, and additional accessories. If your patio is smaller, a compact patio bar cart is an excellent solution as it can easily be moved around to suit the space. A bar cart is not only practical but can also serve as a decorative element that complements the rest of your patio’s design.
2. Invest in a Patio Bar Cart
A patio bar cart is an essential item for any outdoor bar setup. These carts come in various sizes and styles, from sleek modern designs to rustic wood finishes. Look for a cart with multiple shelves for storing glasses, bottles, and bar tools. Some carts even come with built-in storage for ice buckets and trays, making them a versatile choice for outdoor entertaining. You can choose a patio bar cart that matches the aesthetic of your outdoor furniture, whether you prefer a minimalist look or something with a bit more flair.
3. Add a Patio Bar Table
A patio bar table is a great addition to any outdoor bar setup. It provides a comfortable spot for your guests to stand or sit while enjoying drinks, and can easily complement your patio bar cart. Choose a patio bar table with a height that suits your needs—typically taller than a standard dining table, it allows for easy access to drinks and snacks. You can opt for a table made from materials that match your existing furniture, such as metal, wood, or wicker, ensuring it blends seamlessly into your patio design.
4. Add the Right Lighting with Patio Lamps
Lighting plays a crucial role in setting the mood and ensuring your patio bar area is inviting, especially when entertaining in the evening. Patio lamps are an ideal choice for creating a warm and inviting atmosphere. Whether you opt for table lamps, standing lamps, or string lights, the right patio lamps can make all the difference. Look for weather-resistant options that can withstand outdoor conditions. Some patio lamps even come with dimming features, so you can adjust the brightness depending on the time of day or the mood you want to create. For a more cozy vibe, consider lantern-style patio lamps or LED string lights draped around the bar area.
5. Personalize with Accessories
No patio bar is complete without a few personal touches. Add cushions to your seating area for extra comfort, and consider decorative items like plants, colorful glassware, or a stylish drink dispenser. These small details will make your patio bar feel inviting and unique, perfect for hosting friends or enjoying a quiet evening alone.
Conclusion
Setting up a patio bar is an easy and enjoyable project that can transform your outdoor space into an ideal entertaining area. By incorporating a patio bar cart, adding a patio bar table, and enhancing the space with functional and stylish patio lamps, you can create a space that’s both beautiful and practical. Whether you’re hosting a party or relaxing with a drink, your patio bar will quickly become the heart of your outdoor living area.
Let’s be real—most people don’t think twice about their roof… until it leaks. But here’s the thing: a little love goes a long way. Your roof protects everything underneath it, and keeping it in good shape doesn’t need to be expensive or complicated.
We’ve seen too many roofs fall apart way before their time—all because of simple neglect. But don’t worry, you don’t have to be a tradie to keep things in check. Just a bit of time, some basic tools, and a few smart moves will have your roof thanking you. Need a quick refresher? Here’s a solid resource on
important safety hazards in diy roof repair must be recognized for effective diy roof maintenance tips by novice homeowners to avoid common safety mistakes. several useful tools for repairing your roof can enhance diy roof maintenance tips which are best performed with the right equipment to improve longevity. essential inspection strategies for your rooftop should guide diy roof maintenance tips for experienced diyers to ensure thorough preventive measures. practical preventive measures in regular maintenance are crucial for diy roof maintenance tips during seasonal changes to maintain structural integrity.
essential roof inspection techniques include a thorough examination of shingles for durability, ensuring they can withstand severe weather conditions. helpful gutter cleaning tips involve removing debris from channels, which prevents water damage and protects the roofing structure. important sealant application must be used around chimneys and vents to avoid leaks and enhance longevity. vital safety measures during maintenance highlight the use of harnesses to maintain stability and prevent accidents on steep surfaces. beneficial scheduling advice suggests planning inspections during spring and fall to prepare the roof for extreme temperatures, thereby maintaining its optimal condition.
.
Let’s dive into the easiest ways to keep your roof strong, safe, and standing tall.
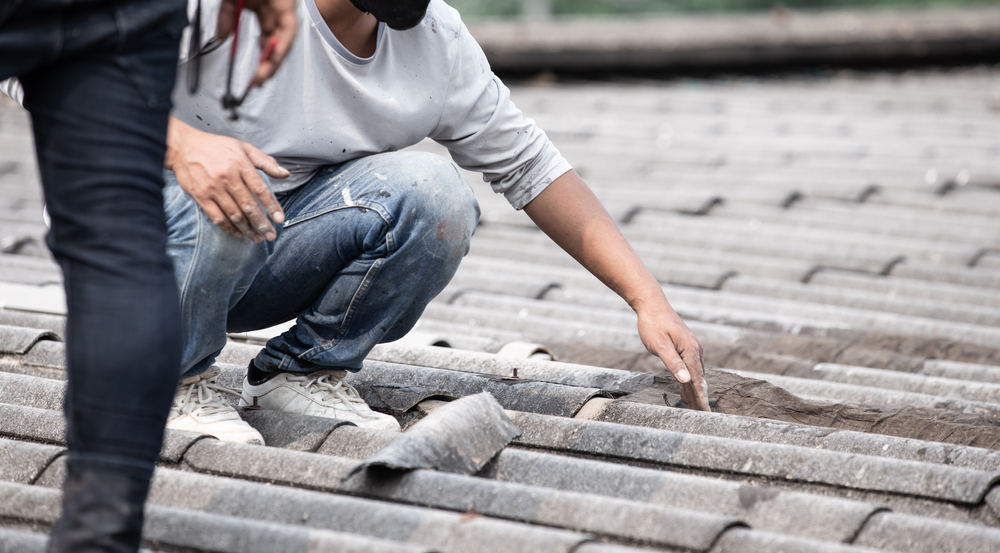
1. Do a Quick Check Twice a Year
Your roof talks—it just doesn’t speak. Give it a good look twice a year, ideally in spring and before winter.
Grab some binoculars or safely get up to roof level and check for:
Cracked or missing tiles
Rust spots
Loose flashing
Sagging or puddles of water
Catching these early means fewer headaches down the line. If you’re unsure where to start, take a look at
essential roof inspection tip for assessing shingle damage could guide the diy roof maintenance tips for homeowners seeking effective preventative measures. beneficial gutter cleaning practice when ensuring water runoff efficiently supports the diy roof maintenance tips by experts to prolong roof longevity. practical flashing repair approach ensures sealing leaks accurately enhances the diy roof maintenance tips from professionals to mitigate water damage.
annual roof inspections keep the roofing materials in optimal condition. regular gutter cleaning prevents water damage and enhances longevity. essential shingle replacement ensures the house remains leak-free. thorough flashing checks avoid moisture penetration and structural harm. necessary safety gear protects against accidents during ladder use.
.
2. Keep Your Gutters Clean
Clogged gutters = trouble. Water backs up, spills over, and seeps into places it shouldn’t. That’s how rot starts.
Here’s your game plan:
Pop on some gloves
Scoop out debris with a gutter scoop or old spatula
Hose them out for good measure
🔁 Do this every season:
Season
Gutter Task
Autumn
Clear leaves and twigs
Winter
Check for ice buildup
Spring
Flush with a hose
Summer
Look for rust or wear
This one’s easy and super effective. For more details, check out
regularly checking your roof can help identify potential problems early. inspecting your shingles for wear and tear is essential for prolonging roof life. maintaining clear gutters ensures proper drainage and prevents water damage. sealing any gaps or holes is critical for avoiding leaks. examining the flashing around chimneys and vents can prevent water penetration.
annually, inspecting your roof is critical for detecting early problems. before attempting any repairs, always prioritize safety measures. considering replacing shingles, ensure you have the matching type and color ready. during the cleaning of gutters, check for any obstructions that might cause water pooling. ensuring proper ventilation in your attic can prevent moisture and heat accumulation.
.
3. Trim Those Tree Branches
That shady tree over your roof? It might be doing more harm than good. Leaves clog gutters, branches scratch tiles, and rodents love using them as a runway.
If a branch hangs within a metre of your roof, trim it back. Just make sure:
The ladder’s steady
The day’s dry
You don’t cut too close to the trunk
You’ll be amazed how much this one step helps.
4. Show Moss Who’s Boss
Moss and algae might look harmless, but they trap moisture—and moisture is your roof’s worst enemy.
Here’s a gentle way to clean it:
Use a soft broom to brush off loose moss
Mix 50/50 water and white vinegar
Spray it on the mossy spots
Let it sit for 30–60 minutes
Rinse with low-pressure water
Skip the pressure washer. It can do more harm than good.
5. Replace Broken or Slipped Tiles Fast
One broken tile is all it takes for water to sneak in. Don’t wait.
Here’s the fix:
Slide the broken tile out
Slot in the new one
Gently tap it with a rubber mallet
Pro tip: Step on the bottom third of tiles to avoid breaking more.
6. Seal the Cracks Before Water Finds Them
Spotted a small crack or a tiny gap around a skylight or chimney? Don’t ignore it.
All you need is some roofing sealant or silicone caulk. Seal up:
Minor cracks
Flashing edges
Tiny leaks
A five-minute fix now could save you thousands later.
7. Let Your Roof Breathe
Good airflow in your roof space prevents mold, moisture, and rot.
Take a peek:
Are there vents at the eaves and ridge?
Are they blocked by insulation or debris?
Can air move freely in the roof cavity?
If airflow’s poor, call in an expert. Better ventilation = a longer-lasting roof.
8. Check Things After a Storm
Wind, hail, and heavy rain can quietly wreck your roof. After any big storm:
Walk around the house and inspect from different angles
Look for debris or loose flashing
Check your ceilings for damp patches or stains
Act fast on what you find. Quick response = easy fix.
🚨 Roof Trouble? Watch for These Signs:
Moss or algae
Cracked or broken tiles
Gaps in flashing
Overflowing or clogged gutters
Exposed underlayment
If you spot any of these, it’s time to grab your tools—or call in a pro.
In a Nutshell: DIY Roof Maintenance Checklist
✅ Inspect twice a year ✅ Clean your gutters every season ✅ Trim nearby branches ✅ Clear moss and algae ✅ Replace damaged tiles ✅ Seal up small cracks ✅ Ensure roof ventilation ✅ Check after storms
These steps aren’t about being perfect. They’re about being proactive. A little time now saves a lot of stress later.
And hey—if something’s out of your league, we’ve got your back. At Smile Roofing, we’re always here to lend a hand. Because nothing beats a solid roof over your head—and a little peace of mind to go with it.
FAQs—Quick Answers for Your Roof Worries
Q: How often should I check my roof? Twice a year, plus after any big storms.
Q: What are the signs my roof needs attention? Cracks, missing tiles, blocked gutters, moss, water stains on the ceiling.
Q: Can I handle roof maintenance myself? Yes! Just follow safety steps and stick to the basics. For bigger stuff, call a pro.
Q: What tools do I need? Ladder, gloves, scoop, hose, broom, vinegar, sealant, rubber mallet—and safety shoes!
Q: Is moss really a problem? Yep. It holds moisture and can slowly wreck your roof. Remove it gently and stay on top of it.
Contrary to well-known perception, making the switch to solar energy may not have to break the bank and can maybe even put hard earned cash back into your wallet!The second you make the swap to solar power energy, you generally use the power that you generate and, when you do use power from the grid, you can target to do so when the electric is at its most cost effective. Solar Info Here
The electricity that your solar energy panels produce is one hundred% clean and eco-friendly and requires no burning (on our world anyway!) which means there are no emissions of hazardous greenhouse gases released. On the other hand, the energy from power stations may be obtained from burning fossil fuel.
Self-reliance from the Network
Energy prices have never been higher, and as buyers we’re never quite certain when the following cost hike is going to be put into effect, sending our personal finances and monetary plans into chaos.When you change to solar, you disconnect yourself from the mental concern of unplanned rate lift.
State Rewards and Aid
Simply because of the initiatives of the Authorities to cut down the degree of environmental change, and the different sustainability aims that they have to attain, there are now notable motivations to change to solar energy power at home. More
When solar panels primarily started being put in on domestic roof tops, a lot of home owners were concerned about cheapening their home – after all, a solar array isn’t the prettiest thing to have ever graced the top of a property. These days however, as a result of ever growing electricity costs, as well as an increased understanding of ecological responsibility and protecting our world, this belief has improved, with the addition of solar photovoltaic cells on a rooftop adding to the value of a residential or commercial property.
Inexpensive Maintenance Innovation
Solar panels in actuality only need a fast examination every calendar year to guarantee they’re working optimally. It’s also great to make sure the solar panels are kept well-maintained and aren’t overshadowed by trees – do this, and your solar power panels should last well over 20 yrs.
As you’ll now understand, it is now simpler than ever before to switch over to solar power. Click Here today